Hyundai Tucson: Checking the transaxle fluid (automatic)
Transaxle fluid in the automatic transaxle should be checked at those intervals specified in the vehicle maintenance schedule in Section 5.
NOTE: Automatic transaxle fluid is basically red color. As driving distance increases, the fluid color turns darkish red gradually. It is a normal condition and you should not judge the need to replace based upon the changing color. You must replace the automatic transaxle fluid in accordance with intervals specified in the vehicle maintenance schedule in section 5.
Recommended Fluid
Your Hyundai automatic transaxle is specially designed to operate with HYUNDAI GENUINE ATF SP III, DIAMOND ATF SP III, SK ATF SP III or other brands meeting the SP III specification approved by Hyundai Motor Co.. Damage caused by a nonspecified fluid is not covered by your new vehicle limited warranty.
CAUTION: Use of aftermarket ATF additives may cause damage to the automatic transaxle. Only use HYUNDAI GENUINE ATF SP III, DIAMOND ATF SP III, SK ATF SP III or other brands meeting the SP III specification approved by Hyundai Motor Co.. If you are having your vehicle serviced at a facility other than a Hyundai dealer, verify that the correct ATF is used for your vehicle.
Transaxle Fluid Capacity
The fluid capacity of the automatic transaxle is 8.2 U.S. quarts (7.8 liters).
WARNING: The transaxle fluid level should be checked when the engine is at normal operating temperature. This means that the engine, radiator, exhaust system etc., are very hot so you should exercise great care not to burn yourself during this procedure.
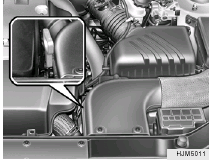 Checking the Automatic Transaxle Fluid Level
The automatic transaxle fluid level should be checked regularly. Keep the vehicle on the level ground with the parking brake applied and check the fluid level according to the following procedure. 1. Place the shift lever in N (Neutral) position and confirm the engine is running at normal idle speed. 2. After the transaxle is warmed up sufficiently (fluid temperature 158~176°F), for example by 10 minutes usual driving, move the shift lever through all positions then place the shift lever in N (Neutral) or P (Park) position.
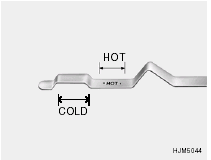
3. Confirm if the fluid level is in “HOT” range on the level gauge. If the fluid level is lower, add the specified fluid from the fill hole. If the fluid level is higher, drain the fluid from the drain hole. 4. If the fluid level is checked in cold condition (fluid temperature 68~86°F), add the fluid to the “COLD” line and then recheck the fluid level according to the above step 2.
WARNING: The cooling fan is controlled by engine coolant temperature and may sometimes operate even when the engine is not running. Use extreme caution when working near the blades of the cooling fan, so that you are not injured by a rotating fan blade. As the engine coolant temperature decreases, the fan will automatically shut off. This is a normal condition.
Checking the brakes
CAUTION: Because brakes are essential to the safe operation of the car, it is suggested that they be checked and inspected by your Hyundai dealer. The brakes should be checked and inspected for wear at those intervals specified in the vehicle maintenance schedule.
Checking the Brake Fluid Level
WARNING: Use caution when handling brake fluid. It can damage your vision if it gets into your eyes. It will also damage your vehicle's paint if spilled on it and not removed immediately.
Recommended Brake Fluid
Use only hydraulic brake fluid conforming to DOT 3 or DOT 4 specifications in your braking system. Follow the instructions printed on the container.
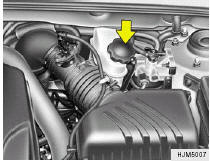 To Check the Fluid Level
The fluid level in the brake fluid reservoir should be checked periodically. The level should be between the "MIN" and "MAX" marks on the side of the reservoir. If the level is at or below the "MIN" mark, carefully add fluid to bring it up to "MAX". Do not overfill.
Adding Brake Fluid
WARNING: Handle brake fluid carefully. It can damage your vision if it gets into your eyes. Use only DOT 3 or DOT 4 specification fluid from a sealed container. Do not allow the fluid can or reservoir to remain open any longer than required. This will prevent entry of dirt and moisture which can damage the brake system and cause improper operation.
To add brake fluid, first wipe away any dirt then unscrew the fluid reservoir cap. Slowly pour the recommended fluid into the reservoir. Do not overfill. Carefully replace the cap on the reservoir and tighten.
Checking the clutch fluid
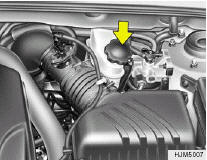 To Check the Clutch Fluid
The clutch fluid level in the master cylinder should be checked when performing other under hood services. The system should be checked for leakage at the same time. Check to make certain that the clutch fluid level is always between the "MAX" and "MIN" level markings on the fluid reservoir. Fill as required. Fluid loss indicates a leak in the clutch system which should be inspected and repaired immediately. Consult your Hyundai dealer.
To Replace the Fluid
Recommended brake fluid conforming to DOT 3 or DOT 4 specification should be used. The reservoir cap must be fully tightened to avoid contamination from foreign matter or moisture.
NOTE: Do not allow any other liquids to contaminate the brake fluid. Seal damage will result.
WARNING: Use caution when handling brake fluid. It can damage your vision if you get it in your eyes. It will also damage your vehicle's paint if spilled on it and not removed immediately.
Air cnditioning care
Keeping the Condenser Clean
The air conditioning condenser (and engine radiator) should be checked periodically for accumulation of dirt, dead insects, leaves, etc. These can interfere with maximum cooling efficiency. When removing such accumulations, brush or hose them away carefully to avoid bending the cooling fans.
Checking the Air Conditioning Operation
1. Start the engine and let it run at a fast idle for several minutes with the air conditioning set at the maximum cold setting. 2. If the air coming out of the in-dash vents is not cold, have the air conditioning system inspected by your Hyundai dealer.
CAUTION: Running the air conditioning system for extended periods of time with a low refrigerant level may damage the compressor.
Lubrication
To lubricate the compressor and the seals in the system, the air conditioning should be run for at least 10 minutes each week. This is particularly important during cool weather when the air conditioning system is not otherwise in use.
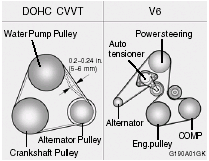 Checking the Compressor Drive Belt
When the air conditioning is being used regularly, the compressor drive belt tension should be checked at least once a month with the engine turned off. To check the drive belt tension, press down on the belt halfway between the engine crankshaft and compressor pulleys. Pressing with your finger, you should not be able to deflect this belt anymore than 1/3 of an inch. If the belt is too loose, have it adjusted by your Hyundai dealer.
Changing the climate control air filter
(For Evaporator and Blower Unit) (If Installed)
The climate control air filter is located in front of the evaporator unit behind the glove box. It helps to decrease the amount of pollutants entering the car.
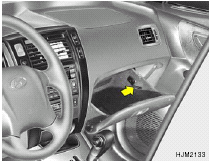
1. Open the glove box and remove the support strap through the hole.
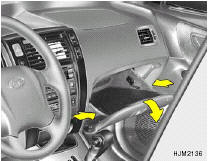
2. Lower the glove box down completely by pushing the both sides of the glove box inward.
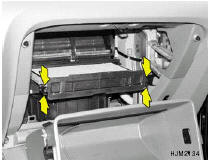
3. Remove the climate control air filter cover by pressing both side's clips.
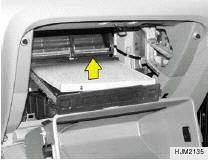
4. Remove the climate control air filter by lifting it. 5. Installation is the reverse order of disassembly.
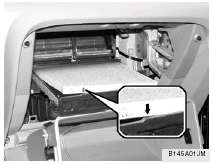
CAUTION: Be sure to install the air conditioner filter in the direction of the arrow sign. Otherwise, noise or filter damage may result.
Checking the free-play
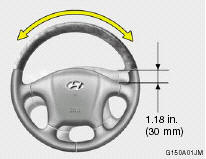 STEERING WHEEL
To check the steering wheel free-play, stop the car with the wheels pointed straight ahead and gently move the steering wheel back and forth. Use very light finger pressure and be sensitive to changes in resistance that mark the limits of the free-play. If the free-play is greater than specified, have it inspected by your Hyundai dealer and adjusted or repaired if necessary.
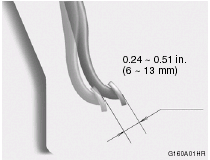 CLUTCH PEDAL FREE PLAY
With the engine off, press lightly on the clutch pedal until you feel a change in resistance. This is the clutch pedal free-play. The free-play should be within the limits specified in the illustration. If it is not, have it inspected by your Hyundai dealer and adjusted or repaired if necessary.
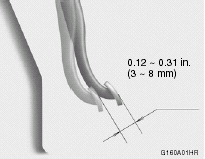 BRAKE PEDAL FREE PLAY
With the engine off, press down on the brake pedal several times to reduce the vacuum in the brake booster. Then, using your hand, press down slowly on the brake pedal until you feel a change in resistance. This is the brake pedal free-play. The free-play should be within the limits specified in the illustration above. If it is not, have it inspected by your Hyundai dealer and adjusted or repaired if necessary.
Checking brake pedal clearance
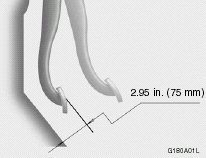
You need a helper to check the brake pedal clearance. With the engine running, have your helper press down on the brake pedal several times and then hold it down with a force of about 110 lbs (50 kg, 490 N). The brake pedal clearance is the distance from the top surface of the brake pedal to the asphalt sheeting under the floor mat. If the brake pedal clearance is not within the limits specified in the illustration, have it inspected by your Hyundai dealer and adjusted or repaired if necessary.
Checking drive belts
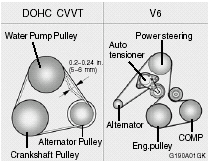
Drive belts should be checked periodically for proper tension and adjusted if necessary. At the same time, belts should be examined for cracks, wear, fraying or other evidence of deterioration and replaced if necessary. Belt routing should also be checked to be sure there is no interference between the belts and other parts of the engine. After a belt is replaced, the new belt should be adjusted again after two or three weeks to eliminate slack resulting from initial stretching after use.
See also:
Intelligent Key system (if so equipped)
- Radio waves could adversely affect
electric medical equipment. Those
who use a pacemaker should contact
the electric medical equipment
manufacturer for the possible influences
before use.
- The Intelligent Key transmits radio
waves ...
Heating and ventilation
There are three controls and two switches for
the heating and cooling system. They are:
1. Air flow control.
2. Fan speed control.
3. Temperature control.
4. Air intake control switch.
5. Air conditioning switch.
Fan Speed Control ( ...

 Checking and changing the engine coolant